Tag Archive for: eq

Briefly explained:

A filter allows you to remove unwanted frequencies and also allows you to boost certain frequencies. Which frequencies are removed and which frequencies are left depends on the type of filter you use.

Before we can list the different types of filters and what they do, there are a few terms and definitions we need to cover. These are crucial and are used all the time so it is important that you know what these terms are and what they mean.

Cut-off frequency This is the point (frequency) at which the filter begins to filter (block or cut out). The filter will lower the volume of the frequencies above or below the cut-off frequency depending on the type of filter used. This ‘lowering of the volume of the frequencies,’ is called Attenuation. In the case of a low pass filter, the frequencies above the cut off are attenuated. In the case of a high pass filter, the frequencies below the cut off are attenuated. Put simply: in the case of a low pass filter, we are trying to block the (higher) frequencies above a certain point and allow the lower frequencies through. In the case of a high pass filter, the opposite is true. We try to cut out or block frequencies below a certain point and allow the higher frequencies through. On analogue synthesizers, this cut-off was called the slope or gradient. The actual terminology was more accurately described as the RC(resistor/capacitor).

Analogues use circuitry and for that reason alone, it takes time for the filter to attenuate frequencies, in proportion to the distance from the cut-off point. Today’s technology allows for instant cut-off as the filter attenuation is determined by algorithms as opposed to circuits. That is why the filters of an Arp or Oscar etc, are so much more expressive and warm as they rely completely on the resistors and capacitors to, first warm-up, then to work but in a gradual mode(gradual meaning sloped or curved as opposed to instant). Depending on how well a filter attenuates or the way it attenuates gives us an idea of the type of sound we will achieve with an analogue filter. You often hear someone say ‘That Roland is warm man’ or ‘Man, is that Arp punchy’. These are statements that explain how Roland’s filters sound or how potent the Arp’s filters are. So, the speed at which the filter attenuates is called the slope or gradient.

Another point to raise now is that you will often see values on the filter knobs on analogue synthesizers that have 12dB or 24dB per octave. That basically means that each time the frequency doubles, the filter attenuates by 12dB or 24dB everything at that frequency. These are also known as 2 pole or 4 pole filters each pole represents 6dB of attenuation. This is how analogue circuits were built, the number of circuits being used by the filter to perform the task at hand.

If you delve into the filters that Emu provide on their synthesis engines, then it could go into pages, if I had to list them all. But for now, I am keeping it simple and listing the standard filter types and what they do.

Low Pass-LPF

As mentioned earlier, this filter attenuates the frequencies above the cut-off point and lets the frequencies below the cut-off point through. In other words, it allows the lower frequencies through and blocks the higher frequencies, below and above the cut-off (the frequency at which the filter begins to kick in). The low pass filter is one mutha of a filter. If you use it on a bass sound, it can give it more bottom and deep tones. If used on a pad sound, you can have the filter open and close or just sweep it and it gives that nice closing and opening effect. You can also use this filter cleverly by removing higher frequency sounds or noise that you don’t want in your sound or mix. Because it blocks out higher frequencies at the cut off you set, then it’s a great tool if you want to remove hiss from a noisy sample or, if you use it gently, you can remove tape or cassette hiss.

High Pass-HPF

This is the opposite of the low pass filter. This filter removes the frequencies below the cut-off and allows the frequencies above the cut-off through. Great for pad sounds, gives them some top end and generally brightens the sound. It’s also really good on vocals as it can give the vocals more brightness and you can also use it on any recordings that have a low-frequency hum or sound that is dirtying the sound, although, in this instance, it would be a limited tool, as you could also cut out the lower frequencies in the sound itself, but still a tool that has many uses.

Band Pass-BPF

This is a great filter. It attenuates frequencies below and above the cut-off and leaves the frequencies at the cut-off. It is, in effect, a low pass and a high pass together. The cool thing about this filter is that you can eliminate the lower and higher frequencies and be left with a band of frequencies that you can then use as either an effect, as in having that real mid-range type of old radio sound or use it for isolating a narrow band of frequencies in recordings that have too much low and high end. Sure, it’s now really made for that but the whole point of synthesis is to use tools because that’s what they are, tools. Breaking rules is what real synthesis is all about. Try this filter on synthesizer sounds and you will come up with some wacky sounds. It really is a useful filter and if you can run more than one at a time, and select different cut-offs for each one, then you will get even more interesting results.

Interestingly enough, bandpass filtering is used on formant filters that you find on so many softsynths, plugins, synthesizers and samplers. Emu are known for some of their format filters and the technology is based around bandpass filters. It is also good for thinning out sounds and can be used on percussive sounds as well as creating effects type of sounds. I often get emails from programmers wanting to know how they can get that old radio effect or telephone line chat effect or even NASA space dialogue from space to Houston. Well, this is one of the tools. Use it and experiment. You will enjoy this one.

Band Reject Filter-BRF-also known as Notch

This is the exact opposite of the bandpass filter. It allows frequencies below and above the cut-off and attenuates the frequencies around the cut-off point. Why is this good? Well, it eliminates a narrow band of frequencies, the frequencies around the cut-off, so, that in itself is a great tool. You can use this on all sounds and can have a distinct effect on a sound, not only in terms of eliminating the frequencies that you want to be eliminated, but also in terms of creating a new flavour to a sound. But its real potency is in eliminating frequencies you don’t want. Because you select the cut-off point, in essence, you are selecting the frequencies around that cut-off point and eliminating them. An invaluable tool when you want to hone in on a band of frequencies located, for example, right in the middle of a sound or recording. I sometimes use a notch filter on drum sounds that have a muddy or heavy midsection, or on sounds that have a little noise or frequency clash in the midsection of a sound.

Comb

The comb filter is quite a special filter. It derives its name from the fact that it has a number of notches at certain distances (delays), so it looks like a comb. The Comb filter differs from the other filter types, because it doesn’t actually attenuate any part of the signal, but instead adds a delayed version of the input signal to the output, basically a very short delay that can be controlled in length and feedback. These delays are so short that you only hear the effect rather than the delays themselves. The delay length is determined by the cut-off. The feedback depth is controlled by the resonance.
This filter is used to create a number of different types of effects, chorus and flange being two of the regulars. But the comb filter is more than that. It can be used to create some incredible dynamic textures to an existing sound. When we talk of combs, we have to mention the Waldorf synthesizers. They have some of the best comb filters and the sounds they affect are so distinct, great for that funky metallic effect or sizzling bright textures.

Parametric

This is also called the swept eq. This filter controls three parameters, frequency, bandwidth and gain. You select the range of frequencies you want to boost or cut, you select the width of that range and use the gain to boost or cut the frequencies, within the selected bandwidth, by a selected amount. The frequencies not in the bandwidth are not altered. If you widen the bandwidth to the limit of the upper and lower frequencies ranges then this is called shelving. Most parametric filters have shelving parameters. Parametric filters are great for more complex filtering jobs and can be used to create real dynamic effects because they can attenuate or boost any range of frequencies.

Well, I hope this has helped to demystify the confusing world of filters for you and I suggest that you ignore the filters on your synthesizers, be they hardware or software, at your own peril because they are truly powerful sound design functions. But if you want a whole book dedicated to equalisation and filtering then I suggest you have a look at EQ Uncovered – (second edition) This book has received excellent reviews and well worth exploring.

If you prefer the visual approach try this video tutorial:

Filters and Filtering – what are filters and how do they work

iZotope Neutron Elements – $129

As with all my existing and future reviews, I will only be reviewing what I use and in practice and I will keep all reviews as working reviews and not an epic encyclopedia of opinions. I will leave that to the magazines and e-zine sites.

This month I am going to go on and on and on about iZotope’s Neutron Elements, a wonderful all in one solution to all things that need clever algorithmic analysis and processing.

The key features of Neutron Elements are:

  • Track Assistant – iZotope’s clever analyse and compensatory tool.
  • Track identification – Neutron Elements identifies the type of ‘instrument’ being used and applies compensatory profiles at a click.
  • EQ Learn – Neutron Elements listens to the incoming audio and applies, yet again, clever compensation.
  • Four powerful single band processors: EQ, Compressor, Exciter and Transient Shaper – a modular approach to processing.
  • Over 200 presets for you to start from or use as is.
  • Linear and Minimum Phase topologies that help to further shape your sounds.
  • Mode selection tools based on the type of instrument and sound.
  • Choice of interesting Responses for EQs.
  • Fully Configurable.
  • Fully automated.

Neutron Elements (NE) is a honed down version of iZotope’s Neutron but is still an extremely powerful tool offering the user countless configurations of dynamic tools. Brimming with instrument-specific presets Neutron Elements presents the user with excellent starting templates to hone and edit to taste. Neutron Elements follows the channel-strip concept and features four modules and Track Assistant on top! But beneath the simple GUI lies a wealth of quality processors.

The beauty of the modular approach is that the order of dynamics can be changed by grabbing any module and moving it before or after another module. This means you are not restricted to using a fixed modular approach. Eq before compression? Sure, why not? Eq after compression? Sure, why not? The ability to chop and change the order of dynamics is as potent as the processors provided.

Track Assistant

Track Assistant is an interesting tool and can be compared to all analysis and compensatory processes in that it will analyse the incoming audio and make working suggestions as to how to sonically improve the results. This is not new technology and has been in use by many companies for many years. In fact, I would go as far as saying that HarBal reigns supreme here and not only is it a better mastering and processing tool it is also far more intuitive than Neutron. Whereas Neutron Elements suggests a single solution to each profile HarBal goes further and offers a combination of suggestions all based on simple physics as opposed to subjective opinions of producers and their preset profiles. That is not to say Neutron Elements does not offer powerful ‘suggestive’ options as to what to use and how to use it. You could, in effect, just use Track Assistant and be done with your audio….but I suggest you go a little further and switch off this feature and work with the truly wonderful features that reside in this powerful software.

When dealing with audio we are invariably concerned with cleaning, shaping, and dynamic control. NE provides all the necessary tools to achieve these goals. An equaliser sits in the prime spot, and rightly so, as we need to bandpass and clean redundant frequencies at both the channel and master bus stages. However, if you don’t fancy an eq at the start of the chain, it is as easy as clicking on the module and dragging it where you do want it to sit. In the event that you only want to filter and not clean then NE gives us the very useful Vintage response, in addition to the existing Shelf and Baxandall modes (there are times when pre-ringing is exactly what we want). The eq bands are not fixed and all have Q controls. Additionally, iZotope have thrown in a Learn function. This, when selected, will analyse the incoming audio and suggest where the frequency nodes should sit. After that, it is just a matter of cut and boost. Clever and useful.

Compressor

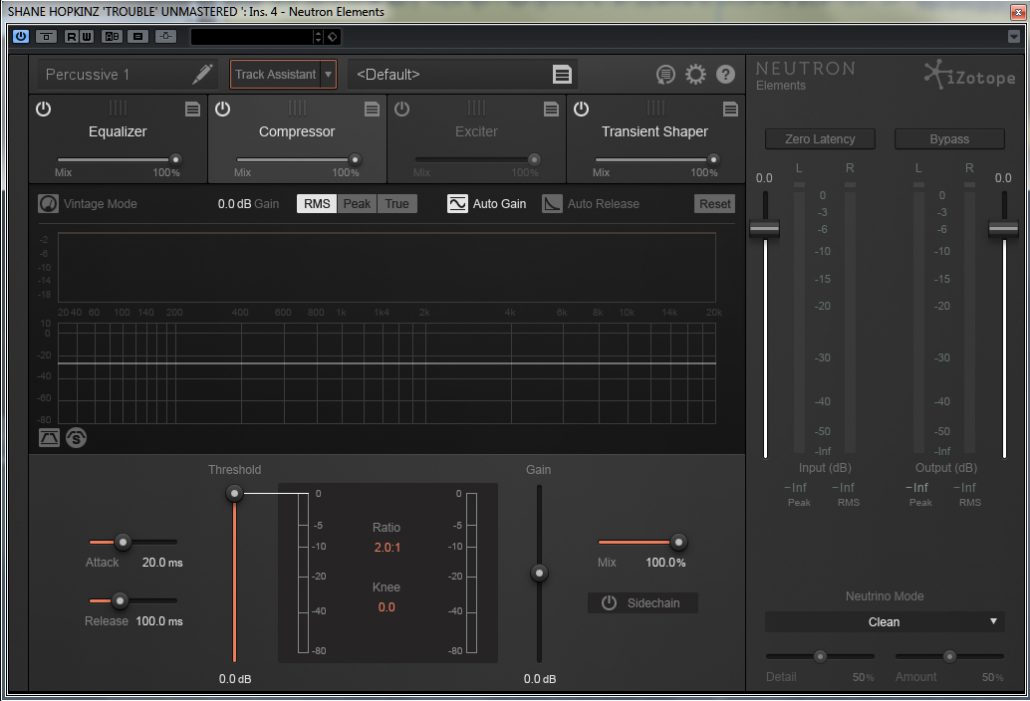
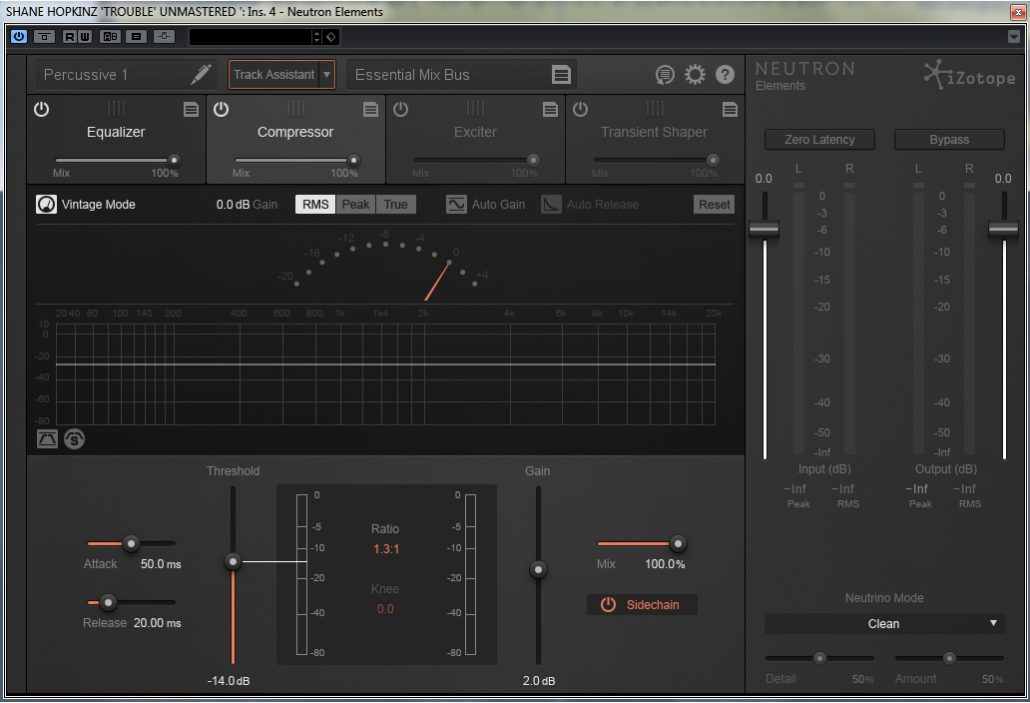
Next up, we have a very useful compressor that can be used in parallel mode and is as easy to use as possible. The compressor works using two Modes: Digital and Vintage. Think of Digital as uncoloured and Vintage as coloured.

Level Detection Mode

These three buttons, RMS, Peak, and True, allow you to adjust which level detection mode the Compressor uses, as follows:

  • Peak enables Neutron’s detection circuit to look at peak levels of the incoming signal. In general, this setting is useful when you are trying to even out sudden transients in your music.
  • RMS enables Neutron to look at the average level of the incoming signal. RMS detection is useful when you are trying to increase the overall volume level without changing the character of the sound.
  • True mode behaves much like RMS mode, but with some key advantages. Unlike RMS, True mode produces even levels across all frequencies. Additionally, True mode will not produce the aliasing or artifacts that RMS detection can cause (a signal-dependent behavior that is true of any RMS-based compressor, not just Neutron).

VU Meters

In Vintage mode, the gain reduction meter uses a VU meter. The decision to use VU or standard Peak metering is down to the user. I love using VU meters at the channel stage as it allows me to visually detect how well the audio is moving along: is it dynamic or not? That needle bouncing up and down is all I need to feel good about the sound. Of course, I am simplifying this serious subject but because I have covered metering and headroom extensively in my video tutorials I feel I can make that remark without a heavy comeback. Again, and as always, determine what you need the metering for and adjust to those requirements.

Side-chain Filter

This allows you to audition the filtered side-chain signal only, so that you may hear the same audio input that’s triggering the compressor. Click the icon to the right of the Side-chain filter (just below the spectrum view) to engage it. I firmly believe that almost all dynamic processors should have a side-chain function. We have moved on from exclusive amplitude detection and need to refine our triggers better and side-chaining allows for that.

Exciter

The Exciter comes next and it really does make an announcement. Offering 4 modes: Retro, Tape, Warm and Tube it sounds lovely but even more interesting is the fact that these modes/topologies can be automated. Morphing the modes has never been easier than grabbing the main control node and dragging it around the modes whilst recording the automation. It doesn’t end there, the Exciter also has a parallel feature. You can blend (dry/wet mix) the dry and wet signals for further colouring.

Pre-Emphasis Modes

These modes allow you to weight the saturation in or away from different areas of the frequency spectrum:

  • Full offers a gentle, low-mid frequency bump.
  • Defined offers a gentle, high-mid frequency bump.
  • Clear offers a gentle, low-mid frequency attenuation.

Post Filter

The high shelf icon overlaid on the spectrum view is a gentle shelving filter capable only of attenuation, to a maximum of -12 dB within a range of 1 kHz to 20 kHz. Drag the filter node to adjust the frequency and gain of the filter, which will be applied to the entire Wet signal, allowing you to further adjust any high frequencies that have been generated by the Exciter module.

I am a fan of Exciters and use them regularly for exciting reverbs, low-end frequencies, vocals and so on. So long as filtering is applied post excitation you will never end up having a brash sound. I wish more people would explore the power of this process.

Transient Shaper

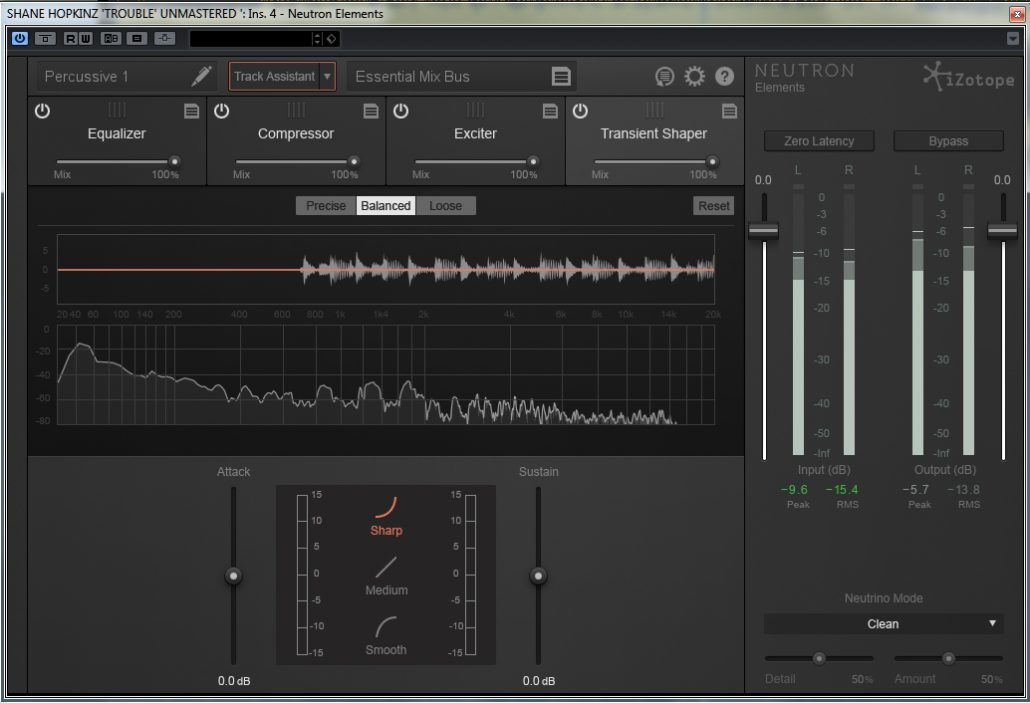
Finally, the Transient Shaper rears its head. Transient Shapers are the new craze. Whereas we used to use amplitude envelopes we now have dedicated transient shapers to further ‘shape’ the sound in a way a simple amplitude envelope cannot. However, if I had to be honest here, Transient Shapers (TS) are glorified envelopes with velocity curve functions. The TS in Neutron Elements offers 3 curve modes: Sharp, Medium and Smooth. That is more than enough to shape a whole channel and deliver the best response.

Gain Adjustment Trace

This view offers a scrolling meter that displays the incoming signal’s waveform with a superimposed curve that illustrates the amount of gain adjustment taking place in real-time.

Paying close attention to the trace juxtaposed over the waveform, and how it illustrates the effect changing envelope modes can have on allowing audio to return to 0 dB of gain before the next transient, is an important tool when seeking to achieve maximum transparency.

Note: the scale can be adjusted on the left-hand side.

The Transient Shaper is more than a glorified envelope. It is actually a potent sound design tool and can be used to create new textures as opposed to simply adjusting the ADSR elements of an envelope.

Metering

Finally, metering. I expect almost all developers nowadays to provide extensive metering options bearing in mind the mediums we have to cater for.

The following, from iZotope’s website, should help to clarify issues:

Meter Type

This allows you to switch Neutron Elements’ metering between a Peak+RMS combo meter and a Peak+Short-term loudness combo meter.

The combined Peak+RMS meter displays a lower bright bar representing the average level (RMS) and a higher dimmer bar representing peak level. There is also a moving line above the bar representing the most recent peak level or peak hold.

Detect True Peaks

By default, the Input/Output meters will only indicate clipping which occurs within the digital domain. To accurately measure the signal that will result from digital to analog conversion, select “Detect True Peaks.”

Spectrum Type

This feature lets you select between four types of spectrums:

  • Linear: A continuous line connecting the calculated points of the spectrum.
  • 13 Octave: Splits the spectrum into bars with a width of 13 of an octave. Although the spectrum is split into discrete bands, this option can provide excellent resolution at lower frequencies.
  • Critical: Splits the spectrum into bands that correspond to how we hear, or more specifically how we differentiate between sounds of different frequencies. Each band represents sounds that are considered “similar” in frequency.
  • Full Octave: Splits the spectrum into bars with a width of one full octave.

Average Time

This feature averages the spectrum according to this setting. Higher average times can be useful for viewing the overall tonal balance of a mix, while shorter average times provide a more real-time display.

Show Peak Hold

This shows or hides the peak hold in the audio spectrum behind the EQ. Note this is different from the level meters.

Peak Hold Time

Peak hold time determines how long peaks are displayed after they are detected.

Choices include:

  • 5 ms
  • 250 ms
  • 500 ms
  • 1,000 ms
  • 5,000 ms
  • Infinite

Conclusion

Ultimately, software is defined by its price versus feature sets and in this department Neutron Elements is a winner.

The feature set is pretty complete giving the user all the necessary tools, from start to finish, to fully optimise the sound/s.

There are alternatives available on the market but none are as simple and elegant as Neutron Elements. My personal favourite for all mastering chores is HarBal but that is a far more detailed and thorough software and although user-friendly it does require a learning curve.

Neutron Elements affords a simple and detailed all-in-one processing solution and is presented with a streamlined and classy GUI that makes it a joy to use. If you can afford the upgrade to Neutron Standard then don’t blink. The extra features are easily worth the upgrade price.

To me, the best recommendation I can give to any product is as follows:

I use it!