Description
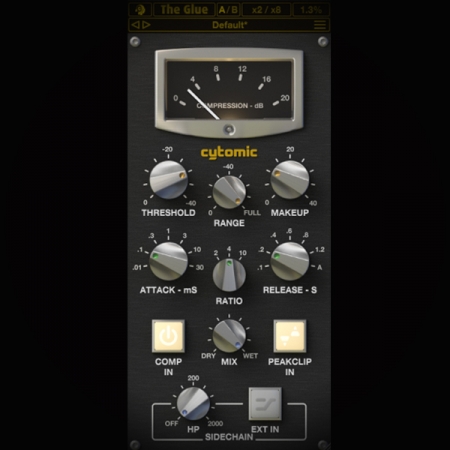
Compression – Science and Application video tutorial explains in detail what a compressor is, how it works and how to use it for various mixing tasks.
Compression is a process we engineers use to control the dynamic range of audio (the difference between the quietest and loudest parts of audio). We do this so that we can level out the audio and allow it to fit into the mix. Let us take a simple example to define the process. On occasion, you will have vocal takes that have huge dynamic range and it can often be difficult to fit this type of vocal into a mix. The reason is simple; the quiet parts of the vocal take can get lost in a mix with so many other sounds playing. The vocals sound great when they hit the loud sections but get lost under all the mix elements when quiet parts are met. So, we narrow the dynamic range and bring the loud bits and quiet bits closer to each other. This helps to level out the volume so it can be heard in any part of the mix.
The most common form of Compression is downward compression. This means that we ‘turn down’ the loudest parts of the audio to closely match the quiet parts. However, there are actually 4 modes of compression and each has its uses. The 4 modes consist of Downward and Upward Compression and Downward and Upward Expansion. These modes are covered in other videos.
The Compression – Science and Application video also covers the workings of the various compressor mode parameters.
Threshold
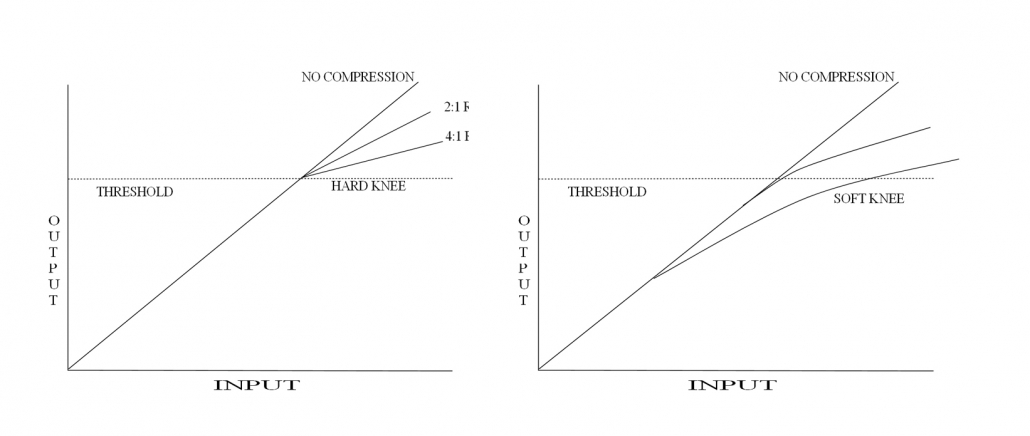
This is the input level above which compression occurs. Above this level, the output increases at a lesser rate than the corresponding input stage. Set the threshold high to compress only the loudest part of the signal, set it low to compress more of the signal.
Ratio
This is the ratio of the change in input level to the change in output level. For example, a 2:1 ratio means that for every 2dB change in input level, the output changes 1dB.
A ‘soft-knee’ characteristic is a low compression ratio for low-level signals and a high ratio for high-level signals. With infinite setting, the output stays the same no matter how much you increase the input.
Attack
This is how fast the compressor reduces the gain when a signal is input. Basically, the time it takes to kick in. Longer attack times mean that more of the signal goes through before it starts to get compressed.
Release
This is how fast the compressor returns to neutral, or how fast the gain returns to normal. Short release times give the famous ‘pumping’ or ‘breathing’ sound and are good for following rapid gain changes.
Gain Reduction
This is the number of dB that the gain is reduced by the compressor, and varies with the input level. This is displayed on the meter.
Side Chain
The part of the circuitry that monitors the input level is known as the side-chain, and it controls that part of the circuitry that adjusts the gain of the main signal path. Additionally, most side-chains have filtering features so the incoming audio signal can be filtered to provide different triggering responses. Using the gate’s side-chain feature opens up a whole new world of sound design processes.
Output Control or Gain Makeup
Because we are squashing peaks in the signal, we are actually reducing the overall peak level, increasing the output level compensates for the volume drop.
Turn this level up until the peak levels of the compressed signal match the bypassed signal peaks.
Peak/RMS
RMS stands for Root Mean Square and is a mathematical term for a method of averaging the level of a complex waveform. If your compressor has a Peak/RMS switch, this will determine how the compressor evaluates the incoming sound level and your choice for selection is dependent on the type of material you will be compressing.
The beauty of using RMS is that we, as humans (some of us anyway), tend to use this method for listening. Our ears average out incoming audio, so RMS works in the same way.
But, as stated, the method chosen is dependent on the audio being processed. For short signals, such as drum sounds, Peak will work much better. In Peak mode, the compressor takes action based on the peak level of the input signal, no matter how long or short the sound is. In this instance, using a fast attack time and the Peak setting will afford far better sonic control over the audio than RMS
I tend to find that RMS works really well on longer, undulating sounds, like vocals, and Peak works well on short sounds, like percussion.
Knee
Knee refers to the way the compressor reacts when the input level reaches the threshold. A hard-knee compressor brings in all the gain reduction as soon as the signal crosses the threshold.
A soft knee on the other hand brings in the compression more progressively by gradually increasing the compression ratio as the signal level approaches the threshold. Again, the decision in choice is down to the material being processed.
Compression is as important as Equalisation and it’s primary objective is to manage the Dynamic Range of Audio. But we have come a long way since the days of using a compressor to manage gains. Compression is now a sculpting tool in its own right.
Let me guide you through the workings and use of this wonderful dynamic.
The plugin used in the Compression – Science and Application video:
Topics covered in this video are:
- What are the Features and Functions of a Compressor
- Side-chaining
- RMS/Peak
- Bus Compression
- Master Bus Compression
- Linear versus Minimum Phase
- Timing and Sync
- Analysis
- Limiting
If this tutorial was of help maybe these will also be of benefit:
The 4 Modes of Compression and Expansion


